Smart Card Solution
User Manual
- R502 Manual
JavaCard API Samples
- Algorithm
Java Card Specification
Knowledge Sharing
Smart Card Solution
User Manual
JavaCard API Samples
Java Card Specification
Knowledge Sharing
This is an old revision of the document!
This article shows you how to use Enigmail+GnuPG to send digitally signed email and encrypted email. You need to use your own key to sign the email and also allow anyone to send encrypted email to you. In addition, you also need one's public key, so that you can send encrypted email to him or verify the signature in the message he sends to avoid the email being tampered .
1)Key Management
Start Thunderbird, click the drop-down menu, and select Enigmail . Then click “Key Management” from the context menu to open Enigmail Key Mangement dialog box.


The Key Management window shows all keys (yours and other people's) you have stored on your computer; this is called your keyring. The set of all public keys that you have collected is often called your public keyring.
If you have run the Setup Wizard and generated a new key pair, or imported an existing one, it will be shown here. (If it doesn't, tick the option Display All Keys by Default.) Otherwise, the window will be empty.
By clicking the expand gadget at the left of each key, you can see the key's additional user IDs and PhotoID, if present. The columns (Key ID, Type, Key Validity, Owner Trust, Expiry, Fingerprint) show a number of other key properties: you can choose which columns you want to see by selecting them in the rightmost gadget in the column header bar. Later we'll explain what these properties mean.
The menu bar of the Key Management window allows you to operate on the keys of your keyring. To do that, select a key, and then choose a menu item. You also have most of these menu items in a pop-up menu that shows up when you right-click on a key. Some menu items will be disabled (greyed out) if the operation is not possible on the key you selected. Some operations on a key require that you have the companion private key, so you can accomplish them on your key pair but not on other people's public keys.
2)Key Pair Generation
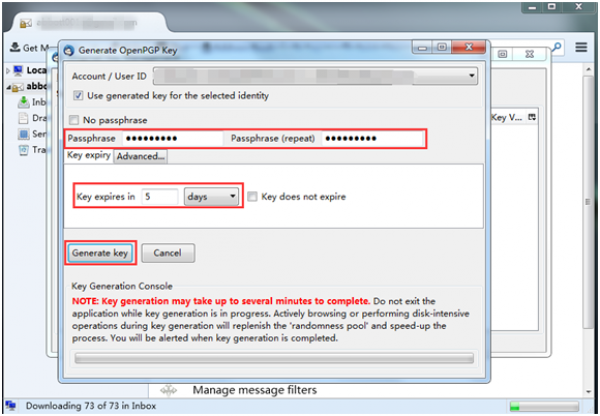
Click “Generate” and select “New Key Pair”.

Please set the passphrase with the length of 8 bytes at least and the Key expiration date. Then click Generate Key button .

In the Enigmail Confirm dialog box, click “Generate Key”.

Click “Generate Certificate”, and save this certificate in your local computer.

Enter the passphrase you set before and click “OK”.

The generated key pair will be displayed in Enigmail Key Mangement dialog box. (If there isn't, please select all the default displayed key.)

3)Check Key Properties
Select your key pair and choose View → Key Properties. A new window will pop up, showing the key's properties; some of these properties are divided into three separate tabs, Basic, Certifications, and Structure. As you've seen, most of these properties can also be viewed directly from the Key Management window.

A drop-down menu named Select action at the lower left of the Key Properties window allows you to perform different operations on the key. The operations you can perform on a key depend whether you have or not the companion private key, so you can accomplish some operations on your key pair only and not on other people's public keys; Enigmail shows only menu items relevant to the permitted operations. The same operations are available from the menu bar within the Key Management window as well.

The Certifications tab shows all the other people's keys that have signed (i.e. certified) this key.

The Structure tab shows all key components i.e. primary key and subkey(s) along with their properties: what the key can be used for (possible values are Sign, Certify, Encrypt, and Authenticate), the key ID, the algorithm used for the key, the key size in bits, the creation date, and the expiration date (if any). Note that the key ID is prepended by the characters 0x, which is the prefix indicating a hexadecimal number.
Once you're done examining the key, hit the Close button to close the Key Properties window and go back to Key Management.
4)Specify Other User IDs
You might desire to use more than one email address to send secure email from. In this case, you do not need to generate one key pair for each address: you may simply associate multiple email addresses to your key pair. This will save you from the burden of managing multiple key pairs.
Select your key pair and choose Edit → Manage User IDs from Key Management, or choose Manage User IDs from the Key Properties of your key. A window will pop up to show you a list of all user IDs (primary user ID and all additional user IDs) that are currently associated with the key. If this is the first time you perform this operation, your key will have only a primary user ID.

The Add and Delete buttons add and delete other user IDs. A user ID is composed of a name and email address; it is also possible to put an optional comment.
The Set primary button sets the selected user ID as primary, and as a consequence the previous primary user ID is relegated to the role of additional user ID.
The Revoke button revokes the selected user ID, which is then greyed out and deactivated. The difference with deletion is that a revoked user ID is still associated to the key pair but no longer usable.
Click on Close window to save the changes you have made to the key and to return to Key Management.
All user IDs are included in the public key when it is sent or exported. There is no mechanism in OpenPGP for selecting which user IDs are included and which not. This also applies to the PhotoID, which is a special type of user ID.
Other Operations: On the key items, you can right-click, there will pop-up a menu and you can select select different menu items to perform the operation. Such as, Add Photo, Change Passphrase, Export Keys to File, Upload public keys, and so on.
5)Send Email
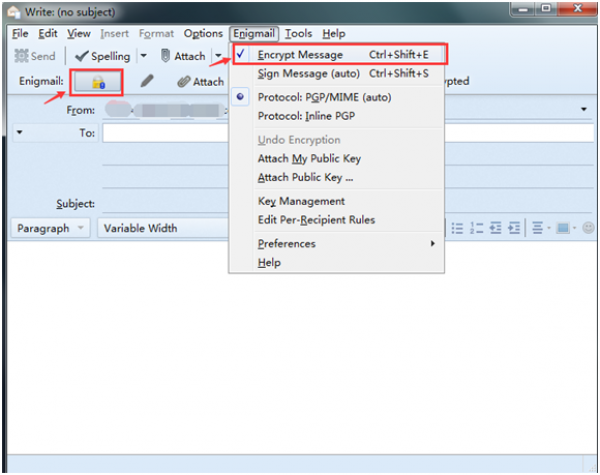
To send encrypted message, please click “Enigmail”- “Encrypt Message”, or directly click the icon.

To sign message, please click “Enigmail”-“Sign Message”, or directly click the icon.

When sending email, “Attach My Public Key” can help you send the public key together to recipients, so that the recipients can verify the signature in the message.
